5. Set Up Your Store
5.1 What is a Store?
A Checkout store represents one physical store which includes all clients, products, suppliers and more that are used on a day-to-day basis. While each Mac is limited to hosting one store, Checkout has a built-in server. This server can share stores over a network with other machines. These machines will automatically seek out other stores on the network, and providing you have a valid username and password to access those stores, you will be able to log into them from your machine and vice-versa.
5.2 Converting Your Old Checkout Store
If you have a store that you used in Checkout version 1.x, you can convert that store to be used in Checkout 2.0. To do so, first create a backup of your 1.x store by going to the File menu and choosing Reveal Database. Copy the file named Store.Checkout to a new location. Once you have created a backup, launch Checkout 2.0. The program will find your 1.x store automatically, and then will ask you if you wish to convert your Checkout 1 store to the Checkout 2 store format. Confirm that you wish to do so by clicking the Convert button. This process can take awhile, depending on the size of the store file and can sometimes fail. If it does fail, your data is fine. You can attempt the conversion again, and if the conversion continues to fail, contact MYOB Customer Service.
US and Canada - Call 877-788-1202
All Other English Language Users - Call 08-082342075
5.3 Creating a New Store
If you are not converting your store from a prior version of Checkout, you will need to create a new store to work in. Below are the steps to be taken to create a store.
1. The first step in creating a new store is to click ‘Create new Store’ from the Welcome Screen. You will be prompted to authenticate by entering your Mac password. Once you have entered your Mac password, you will be brought to the Setup Assistant screen.

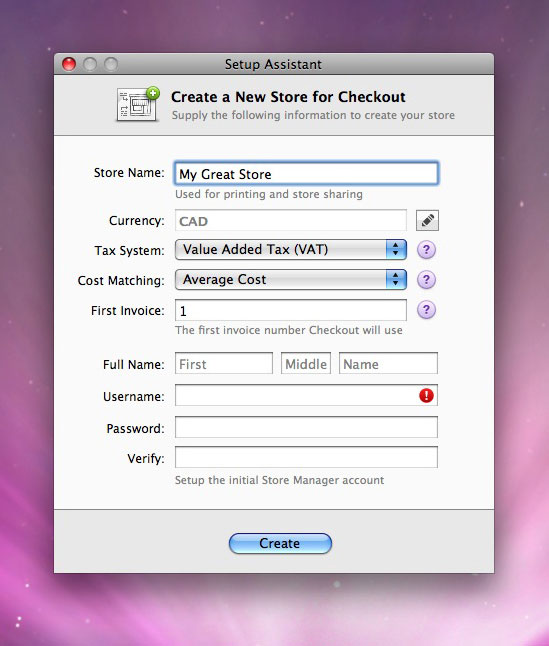
3. Once you have chosen a name for your store, you must decide what type of currency you intend to use. Be careful to select the proper currency, as once you have selected a currency to use, you cannot go back and change it.
4. Now, you are going to need to choose a tax system. The program gives you two options to choose from. Sales Tax is a tax based on the cost of an item or items purchased and is collected directly from the buyer and paid to the government by the retailer. Value Added Tax (VAT) is a tax that is based on each exchange of the item or items and is collected upon each exchange, meaning that tax is collected from the manufacturer, retailer and consumer and then paid to the government by the raw material provider, manufacturer and retailer. To simplify, a sales tax is used by U.S. and Canadian Province governments while a Value Added Tax is used in most other regions.
5. Next up is the choose a cost matching method. Again, the program offers two options. First In, First Out (FIFO) is an option that is used by many companies such as roofing retailers. A product is purchased by the retailer at a specific amount, and more of the same product is later purchased at a higher or lower amount. When cost matching, the system will use the cost of the oldest existing inventory in stock to determine the margin on the sale. The Average Cost method will take all of the purchases of that item, average out what the cost of those items were and then determine the margin on the sale based on the average cost of the product. Be sure to select carefully, as this is not something you can go back and change at a later time.
6. Now, you are at the easy part. It’s time to select a login and create a password for that login. Unlike the things above, this can always be edited by deleting the login and creating a new one. When choosing a password, try to make it as safe as possible. This will prevent other users on your network from being able to log in to your store. Typically, a combination of alpha-numeric characters works best. The only requirement is that the password is longer than 4 characters. Once you’ve chosen a safe password and verified it, click on the CREATE button at the bottom. You will see a status message and then you will be brought to the logon screen. Here, enter your login and password and click the LOGIN button to proceed.
5.4 Initial Settings
Each store can be uniquely customized to benefit your company. These customizable settings are detailed below.
5.4.1 Customize Your Template
To customize your template, go to the Manager button on your top menu and then choose the Template button. This will bring you to a page with 3 template options (Classic, Default and Modern). Choose the template you wish to edit by clicking on it at the bottom of the screen. From there, you are given the options to edit the Logo and Store Information, Invoice Numbering, Print Margins and Advanced Options. To edit any of those, click on the EDIT button to the right of the option you wish to edit. For more detailed information on template customization, please see Chapter 12: Managing Your Store: Templates.
5.4.2 Customize Your Order Numbers
In your store, you have the option to customize how your order numbers will appear in the system and on printed forms. You can customize these numbers by choosing to customize a template and then choosing the EDIT button to the right of the Invoice Numbering option. You can type text in the field and/or drage elements listed at the bottom to make a uniform numbering sequence. For more detailed information on how to customize your order numbers and the options that are available to you, please see Chapter 12: Managing Your Store : Templates.
5.4.3 Create or Import Customers
To create orders, you are going to need to have customers to sell those orders to. So the next step is going to be to create your customer list. To create a new customer, go to the Customer tab on your main screen. To the left of the search bar is a plus (+) logo. Click on that logo and the Customer Inspector screen will appear. Here, you can input information such as the customer name, the company they work for, their address and more. When you are satisfied with the information, click the CLOSE button at the bottom. You will now see your customer listed. If you’ve got a large customer list and would like to import them in bulk, you can do so in any one of several formats. If you export your contacts from another application, the file can be saved and imported in CSV, TSV or VCF formats. If your contacts are all in Apple Address Book, you can import them to Checkout by selecting all the customers you wish to bring over from Address Book and then dragging them to your desktop. This will create a VCard file on your desktop. From within Checkout, go to the File menu and choose the option to Import Customers. You will be prompted to select the VCard file that is on your desktop. The system will automatically match the import fields to within the fields in Checkout. Choose the Import button at the bottom-right corner and a progress bar will show you the status of the import. When the import is complete, a pop-up message will tell you how many records were successfully imported. Click the Close Importer option and verify that the customers were imported by going to your Customer List. The process for importing using a CSV or TSV format is similar, except that you have to match import fields manually after selecting the file you wish to import from. To do so, select the CSV or TSV file which you are using to import customers from, and then use the drop-down lists to match the required fields. When all fields are matched, click the Import button. Again, a progress bar will show the status of the import, and when the import is complete, a pop-up message will tell you how many records were successfully imported. Close the importer and verify that the import worked by viewing your customer list. Please note that the system will import and seek duplicates by customer name. In some instances, it will use a unique ID (for instance, when importing from Apple Address Book) to seek out duplicates. Depending on the option you have selected at the top of the import window, duplicates will either be updated, rejected or created with a suffix. At the end of the import process, the pop-up message will inform you if any records were rejected for being duplicates. If the reject option is not selected, it will just inform you of how many records were imported and will not mention if customer records were updated or not.
5.4.4 Create or Import Products
So, now that you’ve got a customer list created, you’re going to need products to sell. To create a new product, you have to go the the Manager button on your top menu. Once there, click on the Products button. Click on the plus (+) logo at the bottom-left corner of this screen and the New Product window will appear. Here, you will have to give the product a name and a code, and then assign a price and a value to the item as well. The last option is to tell the system if you physically stock the item or not via a checkbox at the bottom of the screen. Once you are satisfied with you information on this screen, click the OK button to continue. You will now see your item in the list. You can edit additional information on that item by clicking on it in the list to the left and then making the necessary changes by updating information on the right side of the screen. Just as with the customer list, if you have a large product list and would like to import them in bulk, you can do so by having them in a file with a CSV or TSV format. When importing products, they are matched by product code rather than product name. To be imported, each product record must have both a product code and a product name. To begin the import process, go to the File menu within Checkout and choose the Import Products option. You will be prompted to select the file you wish to import your products from. When you have selected that file, click the Open button. Now, using the drop-down lists, match the import fields one-by-one. For the fields labeled Has Stock, Needs Serial and Sell Stop, you must select either ‘True for All’ or ‘False for All’. When each field has been matched, you have the option to import stock. If you select this option, any imported stock will show as received from an unnamed supplier in your ledger. When you are ready to continue, select the Import button at the bottom-right corner of the window. A progress bar will show the status of the import. When the import is complete, a pop-up message will appear showing how many records were imported successfully. Depending on the option selected at the top for duplicate records, you may receive messages about records that were not imported. See the pop-up message for details.
5.5 What’s Next?
Now that you’ve created your store and have customers and products all set up, you need to know where to go from here.
5.5.1 Setup Taxes
Depending on the tax system you chose in your intial setup, you will now need to setup your taxes. To get there, click on the Manager button on your top menu. Once there, click on the Taxes button. Click on the plus (+) logo at the bottom-left corner of this screen and a line will appear on your list. You can change the tax name from Untitled to whatever you like. For example, we can use the New Jersey State Sales Tax as an example. You can change the name to NJ State Sales Tax, and then change the percentage from 0.00% to 7.00%. You then have the option to make this your default sales tax by clicking in the check box to the right of the percentage. You can add another tax option or remove one from the list by highlighting the option you wish to remove and clicking on the minus (-) logo in the bottom-left corner of this screen.
5.5.2 Setup Employees
As the manager of the store, you are likely going to have employees who will need access to the program, but you may not want to give them access to the manager screen. To create a new login for an employee, click on the Manager button on your top menu. Once there, click on the Employees button. To add a new employee, click on the plus (+) logo in the bottom-left corner of this screen. The New Employee window will appear and you will be prompted to enter a username, a password and then to verify that password. When you are satisfied with the information on this screen, click the CREATE button. You will now notice your new employee username listed to the left. If you wish to edit the information, click on the username on the left and then you can add your employees name, email address and even edit their password by clicking on the pencil to the right of their username. To remove an employee from this list, simply highlight their username and then click on the minus (-) logo in the bottom-left corner of this screen.
Table of Contents
- Welcome to Checkout
- About this Manual
- The Welcome Screen
- Registering Checkout
- Set Up Your Store
- Managing Your Store
- Managing Your Store - General
- Managing Your Employees
- Managing Your Products
- Managing Your Taxes
- Managing Your Suppliers
- Managing Your Templates
- Managing Your Reports
- Managing Your Ledger
- Logging In
- Daily Usage - General
- Daily Usage - Managing Orders
- Daily Usage - Managing Invoices
- Daily Usage - Managing Customers
- Daily Usage - Till Count
- Stock Room