Checkout Server
About Checkout Server
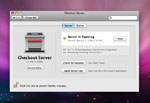
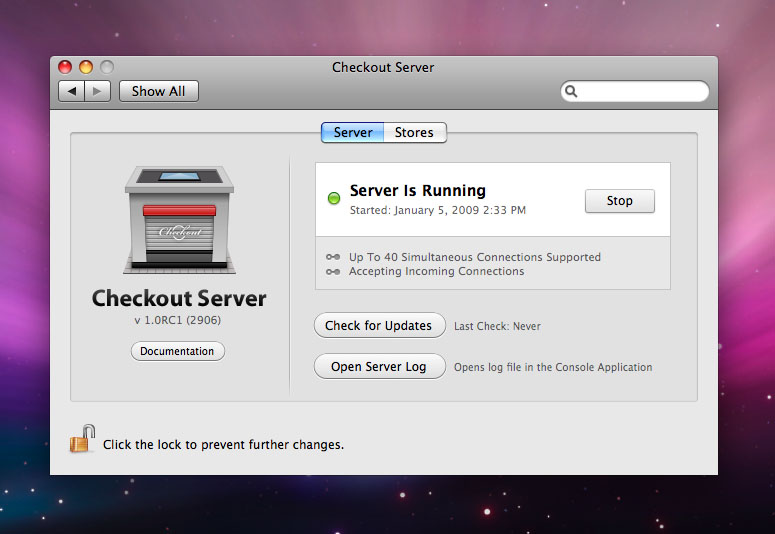
Checkout Server is a free add-on for Checkout. It lets you connect up to 40 Macs, schedule backups and much more. Checkout Server can host as many store database as you want and is designed to run on a dedicated computer. Checkout Server should not be installed on a computer that also has Checkout installed.
Installing Checkout Server
After you download the Checkout Server installer package, simply double-click it and follow the on-screen steps to complete installation. You will be prompted to open the Checkout Server preferences at some point to walk through initial steps needed to set it up.
During initial setup, you will be prompted to create a new user account, or choose an existing account that will own the Checkout Database process. It is highly recommended, for increased security to create a dedicated user account here, that will not be used for anything else. You can read more about why this is recommended over here.
Next, Checkout Server configures your system to allow more memory to be allocated to the underlying PostgreSQL server. When these steps are completed you will be prompted to restart your computer for the new memory allocation settings to become effective.
Importing a Store
Checkout Server cannot create new stores from scratch. To setup a new Checkout store, first install Checkout on another computer and walk through the Store Setup Assistant in Checkout.
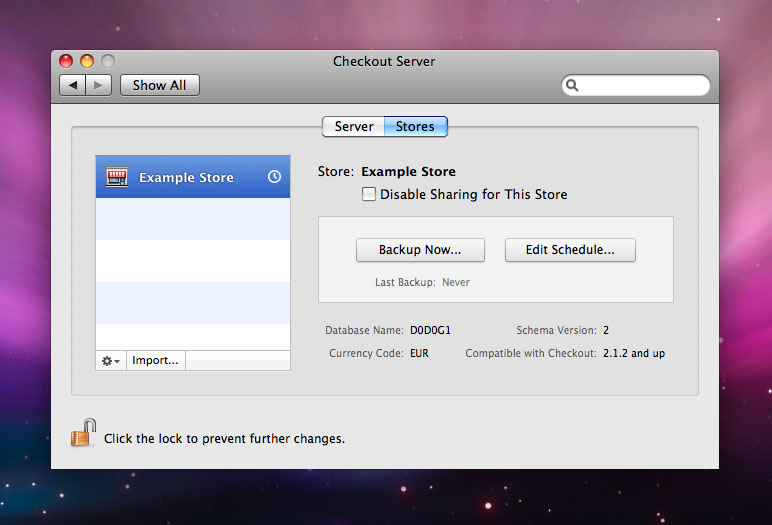
To import a store database, open Checkout on the computer that is currently hosting the store, and choose “Manage Stores” from the Welcome window. In the “Store Administration” window that opens, select your store form the list and create a backup. After you copy the store backup file to the computer running Checkout Server, open the “Checkout Server” System Preferences and go to the “Stores” tab. Click the “Import...” button to load your store database.
Creating Backups
Go to the “Checkout Server” System Preferences pane and click the “Backup Now...” button under the “Stores” tab, select a destination in the dialog that appears and a backup is created and revealed in the Finder. Alternatively, you can also use the “checkoutdb” command-line tool to create a backup. To do so, first type “checkoutdb -stores” in a Terminal window to figure out what the prefix of the store you want to backup is. Next, type “checkoutdb -backupstore <storeprefix> <destination>” in the Terminal. See the command-line reference below for information about additional options.
Setting up a Backup Schedule
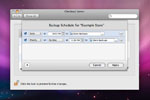

Checkout Server features a very easy-to-use and powerful interface to setup backup schedules for your stores. To configure a backup schedule, go to the “Stores” tab in the “Checkout Server” System Preferences pane and click “Edit Schedule...”. Add additional schedules to the list by clicking the “+” button at the bottom of the Schedule dialog.
Backup schedules are implemented using OS X LaunchAgents. You can review these in the “/Library/LaunchAgents” folder on your Mac. All of the files in that folder with a name starting with “com.madebysofa.chbackup” are created and managed by Checkout Server. Do not edit these LaunchAgents directly, any changes you make may be reverted by Checkout Server the next time you adjust your backup schedule in the System Preferences pane. If you want to implement a LaunchAgent of your own with custom options, you can use one of these as an example and store your modified version under a different name.
Checkout Server Command-Line Tool
Checkout Server comes with an extensive command-line tool. During installation a symbolic link to this tool is created in the “/usr/bin” folder, so you can easily launch it from the Terminal by typing “checkoutdb”. By running “checkoutdb” without any arguments, the same command-line reference as printed below will be printed in your Terminal.
Available Commands:
- -start
- Starts the database server.
- -stop
- Stops the database server.
- -fix
- Attempts to fix common problems.
- -setshared <storeprefix> <value>
- Sets whether a store is shared or not.
- <storeprefix> : is the internal database name of the store
- <value> : 1 to turn sharing on, 0 to turn sharing off
- -backupstore <storeprefix> <destination>
- Creates a backup of a store.
- <storeprefix> : the internal database name of the store
- <destination> : a complete path to the destination
If a filename is provided, checkoutdb will append the extension .checkoutbackup if it's not present in the file.
Options:- -zip : Save the backup as a .gzip file.
- -silent : Do not reveal the backup in the Finder when done.
- -restorebackup <file>
- Loads/imports a store from the specified file.
- <file> : the complete path to a .checkoutbackup file
- -deletestore <storeprefix>
- Deletes a store.
- <storeprefix> : the internal database name of the store
- -renamestore <storeprefix> <name>
- Renames a store.
- <storeprefix> : the internal database name of the store
- <name> : The new name for the store
e.g.: checkoutdb -renamestore D0C2G3 'My Great Store'
- -updateschema <storeprefix> <schema>
- Update the database schema of a store
- <storeprefix> : the internal database name of the store
- <schema> : the schema version to upgrade to
- -stores
- List all hosted stores and update information used by the Checkout Server system preferences pane.
- -setcheckoutdbuser
-
Sets the checkoutdb user, the account that is used to run the
database server to
. - <username> : the short user name of the new checkoutdbuser
- -configureshmem
- Configures Mac OS X shared memory settings, to have effect, the computer must be restarted after setting this.
- -bootstrap
- Create a new Checkout Database folder. This method should only be used when Checkout Server is newly installed.
- -applyanddelete <path>
- Installs and loads all launchAgent templates present in <path>, if
they are valid checkout launchAgents. Then deletes the folder at <path>
- <path> : complete path to a temporary folder
- -clearschedule <storeprefix>
- Clears all configured backup schedules for a store.
- <storeprefix> : the internal database name of the store
- -admintrusted
- Prints whether or not local Administrator connections are trusted, meaning, users can connect to the database with the username 'admin' without entering a password, but only if they are trying to connect with an IP connection from localhost.
- -setadmintrusted <value>
- This configures whether or not local Adminstrator connections
should be trusted. If they are, a user can log in from localhost
using the username 'admin' without a password.
NOTE: Only set Administrator connections to trusted temporarily, and if you know exactly why you need this functionality. Always set Administrator connections to untrusted when you are done.
If you want to setup a permanent account with a known password for administrative purposes using third party adminstrative tools, DO NOT change the password for the 'admin' account.
Instead, set up an additional account with any privileges that you desire and use that from there on.
Changing this value will restart the database server if it is running and disconnect any users that are connected. Starting the server normally will revert the trust settings to off and if needed restart the server if it is already running.
- <value> : 1 to set to trusted, 0 to set to untrusted
Options
- -pause
- Waits 10 seconds before exiting after completion of a command.
Recommended when using checkoutdb as part of a launchd/launchctl
based workflow, to prevent launchd from restarting checkoutdb
because it exited too quickly.
e.g.: checkoutdb -backupstore -pause -silent D0C2G3 /Backups/
All arguments listed between angled brackets are required.
All commands except the -stores command require checkoutdb to be executed as root.
Table of Contents
- Welcome to Checkout
- About this Manual
- The Welcome Screen
- Registering Checkout
- Set Up Your Store
- Managing Your Store
- Managing Your Store - General
- Managing Your Employees
- Managing Your Products
- Managing Your Taxes
- Managing Your Suppliers
- Managing Your Templates
- Managing Your Reports
- Managing Your Ledger
- Logging In
- Daily Usage - General
- Daily Usage - Managing Orders
- Daily Usage - Managing Invoices
- Daily Usage - Managing Customers
- Daily Usage - Till Count
- Stock Room