9. Managing Your Taxes
9.1 Creating a Tax

To create a new tax code, open the Manager Window and select Taxes. Checkout has the ability to handle individual different tax scenarios. The most common is where just one tax rate is used in your store and this is covered first, without the need to create any Tax Regions or apply them to Rates. If you need to charge different tax rates based upon where your customer is from (a different city, county, state, territory, province, or country as examples), please refer to the section (below) Tax Regions before creating Tax Groups and Rates.
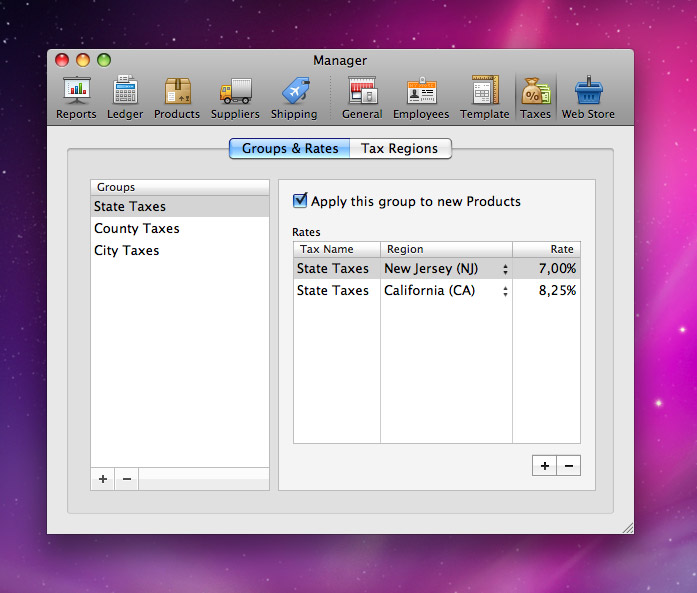
First you must create a new Tax Group. To do this, make sure the Groups and Rates tab is selected, and click on the plus (+) sign under Groups (bottom left corner of the window). This will create a new Tax Group. You can change the name by double-clicking the Tax Group you wish to change and name it after the tax that you will collect. Next you can choose whether to make the Group a default tax or not. When a Tax Group is made a Default, it will automatically default onto all new Products that are manually created and optionally applied to imported Products. Next you can click on the plus (+) sign under Rates (bottom right corner of the window). A new Tax Rate will be created with the same name as the Group. You can change the name by double-clicking it and adjust the rate the same way. The rate can include up to four decimal places.
If you need to create multiple rates that will all apply to the same products, you can create these additional rates under the same Group that you have already created by first selecting the Group (under the Group list) and then once again clicking on the (+) sign under Rates (bottom right corner of the window). These multiple rates are now part of the same Group and will always be applied to a Product if it has the Group applied to it. An example of this is when you have two or more unique tax rates that will always be applied at the same time. When you create one Group with multiple Rates under it, you only need to make sure that the Group is applied to the Product which will be a combined Rate.
9.2 Editing a Tax Group or Rate
To edit a tax code, simply click on an existing entry in the list. From here, you can assign a new name to a group, and change the name or rate of a tax rate. If you change an existing tax code to be a default or remove it from being a default, previously created Products will not be modified. If you change a tax's percentage, any saved Orders will be updated.
9.3 Deleting a Tax Group or Rate
Should you ever need to delete a tax group or code, open the Manager Window and select the Taxes option from there. Select the code you wish to delete by clicking on it to highlight it, and then, in the bottom-left corner of its panel, click on the minus (-) sign. This will remove the tax from your list. Any orders that are in the system will be updated to reflect the deletion of the tax code. Invoices, however, remain unchanged.
9.4 Tax Regions
There are several reasons why you might need to setup multiple Tax Rates, Tax Groups and Tax Regions.
In this case, Checkout provides the flexibility to set up multiple tax groups, rates and regions with the ability to set a default region for walk-in sales at your store as well as a default by customer for those whom you ship orders to.
9.4.1 Setting up Tax Regions
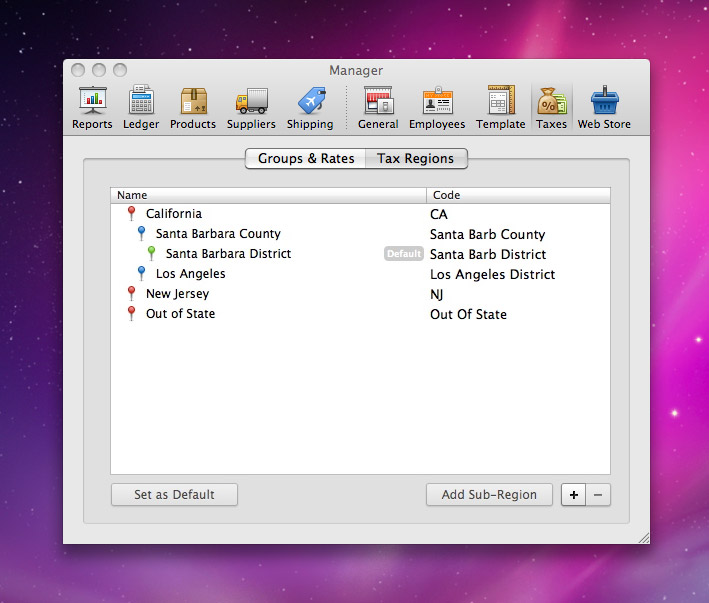
The first step in setting up your taxes would be to start with Tax Regions. A Tax Region could be used to setup with Sub-Regions. For example, if my business is in Santa Barbara, California, there are three taxes and Tax Regions that make up the 8.75% sales tax. I would setup a Tax Region for the state and under that, a Sub-Tax Region for the County and under this county another Sub-Region for the District/City.
I then choose the default region as the lowest level which is in this example, Santa Barbara District. Any sale created will default to use the taxes that are associated with the Region and the two Sub-Regions.
In this example, we have also setup a Tax Region for Los Angeles which is also a Sub-Region of California. This region is used in this example, since I have an office in Los Angeles. Because of this, if I ship an order to a customer that I have in Los Angeles, I can set that customer up to default to this Tax Region and any corresponding tax rates associated with this region.
You’ll also see a Region setup for New Jersey. This region was setup because a warehouse that is owned created a nexus in NJ. Any customers I ship to in NJ will need to be charged NJ state sales tax.
Next, I have setup a Tax Region called Out of State. This region will be used for those customers that I ship orders to who reside outside of CA or NJ. I am not required to charge sales tax in other states in my example. This region I would set as a default on the customers record under shipping so that tax is not charged when shipping to this customer.
9.4.1 Setting up Groups and Rates with Tax Regions
There’s many ways that you can organize Tax Groups. In the example above, I would want to create Groups to organize my State, County, and City/District taxes.
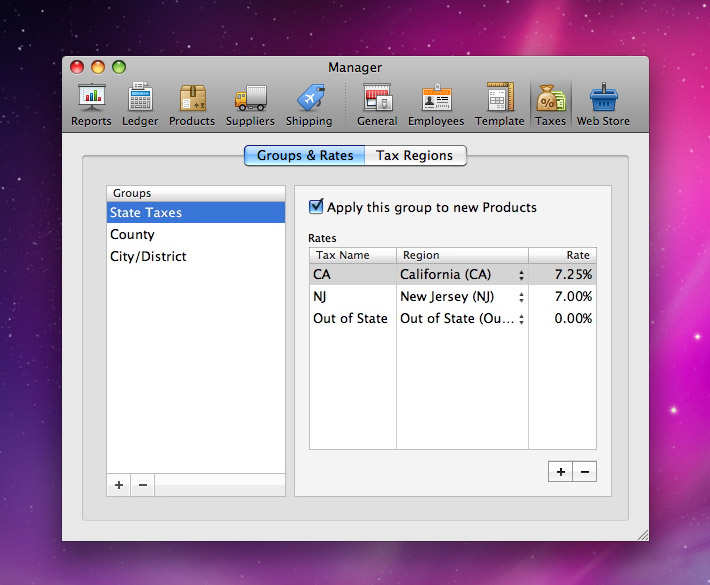
Each Group will contain Taxes with a tax rates. Each Group will also be available on my Products to be selected. In the example below, the tax CA with a rate of 7.25% will be used as my default State Tax on Products because California is part of the default Region I created.
In this case, Checkout will not combine all rates under State Tax. On sales, the State Tax Group will be displayed with a Rates that have the default Region applied to them. In this example below, only the CA rate has a region that is associated with my default Santa Barbara District Region.
The other taxes in this Group will only be used when shipping orders to non-default Tax Regions.
In the example above, I used the “+” sign to create a group called State Taxes. I have also selected the checkbox for “Apply this group to new products”.
Within this State Taxes group, I created a tax for California with the name CA. I then selected the region California from the drop down which we created earlier. I then created a Tax for NJ and for Out of State with the appropriate tax rates and regions.
Note that the tax rate for California is the base state rate of 7.25% and does not include any county, city or district rates.
After creating a County Group, I also created a Tax called SanBarbCounty with a 1% tax rate and applied the region for the county created earlier.
After creating a new Group for City/District, I’ve added a tax for Santa Barbara district with a rate of .5% and a Los Angeles district tax with a rate of 1.5%.
Table of Contents
- Welcome to Checkout
- About this Manual
- The Welcome Screen
- Registering Checkout
- Set Up Your Store
- Managing Your Store
- Managing Your Store - General
- Managing Your Employees
- Managing Your Taxes
- Managing Your Suppliers
- Managing Your Products
- Managing Your Shipping
- Managing Your Templates
- Managing Your Shopify Web Store
- Managing Your Reports
- Managing Your Ledger
- Logging In
- Daily Usage - General
- Daily Usage - Managing Orders
- Daily Usage - Managing Invoices
- Daily Usage - Managing Customers
- Daily Usage - Till Count
- Daily Usage - Printing Labels
- Stock Room